Design Any Product, Part 1: Product Definition (How Not to Build the Wrong Thing)
- Leor Wolins

- Jun 2
- 7 min read
Welcome to Part 1 of the Design Any Product series.
Five parts. One playbook.
By the end of Part 5, you will have a repeatable process for taking any product from a vague idea to a shipped feature.

Part 1 is where most teams either set themselves up for a clean ship or set themselves up for a six-month rewrite. The phase has a boring name (Product Definition) and a glamorous payoff (everything that follows actually works). Skip it and you join the long parade of designers who built the wrong thing brilliantly.
A well-defined product gives your team clarity, aligns stakeholders, and keeps the design process from drifting. Before you open Figma, before you sketch a single wireframe, before you talk about user research, you have to know what you are actually building and why.
3-steps do most of the work in this phase:
Define Project and Scope Frame the project's boundaries and lock the focus.
Value Proposition Mapping Identify what will make the product meaningful to its users.
Concept Sketching Bring abstract ideas to life with visual representation, setting the stage for detailed design work.
Done well, these three steps are the blueprint for a product that meets user needs and delivers measurable value. Done badly, they are the reason your team keeps rebuilding the same screens.


Define Project and Scope
This is where business, product, and design meet for the first conversation that actually matters. Three voices, three jobs, one shared goal: get clear on what is being built before anyone starts building.
Here is the shape of that conversation.
The voice | Their job in this conversation |
Business | Explain requirements, set the goals, and define what success looks like |
Product | Share context, plan the timeline, and allocate the resources |
Design | Communicate pre-design needs, set expectations, and define the milestones |

Now the detail.
Read it once.
Bring it to your next kickoff.
Business Explains Requirements and Goals
Gather Requirements
Conduct meetings with stakeholders to understand the business objectives, project requirements, and success criteria. Ask questions to clarify any ambiguities.
Set Goals
Define clear, measurable goals that align with the business objectives. These goals should address the problem the project aims to solve and the impact it should have.

Product Shares Context and Plans
Contextual Overview
The product team provides a comprehensive overview of the project, including market analysis, user personas, and existing product features. This helps in understanding the broader context.
Timeline Planning
Collaborate with the product team to develop a realistic timeline. Identify key milestones and deadlines, and account for any dependencies or potential bottlenecks.
Resource Allocation
Determine the resources needed, such as team members, tools, and budget. The product team helps in allocating these resources effectively.

Design Communicates Needs and Manages Expectations
Pre-Design Activities
Identify what needs to be done before actual design work begins. This can include user research, competitive analysis, and setting up design tools.
User Research
Plan and conduct user research to gather insights about the target audience's needs and behaviors.
Competitive Analysis
Analyze competitors to understand industry standards and identify opportunities for differentiation.
Design Tools and Setup
Ensure all design tools are set up and ready to use, and create necessary templates or guidelines.
Expectation Management
Set clear expectations with stakeholders about the design process, timelines, and deliverables.
Communication Plan
Establish a communication plan to keep stakeholders informed about progress, changes, and feedback loops.
Milestones and Deliverables
Define key milestones and deliverables for the design phase, such as wireframes, prototypes, and final designs.

Value Proposition Mapping
If scope answers the question "what are we building," value proposition answers the harder question: "why would anyone care?"
Skip this and you ship a feature that nobody asked for. Or worse, that everyone asked for but nobody actually uses.

Five questions structure the work.
The question | What you are defining |
What is the product? | A clear overview and the unique selling points |
Who will use it? | The target audience and the user personas |
Why will they use it? | The user needs, pain points, and the benefits your product delivers |
How does it serve the business? | The objectives and the value propositions that connect user wins to business wins |
How do we keep the team aligned? | Workshops, communication plans, and documentation |
Define What the Product Is
Product Overview
Clearly describe the product, its main features, and its purpose. This should include a high-level summary of what the product does.
Unique Selling Points (USPs)
Identify what makes the product unique and why it stands out from competitors. Highlight any innovative features or benefits that distinguish it.
Identify Who Will Use the Product
Target Audience
Define the primary users of the product. This includes demographic information (age, gender, location), psychographic details (interests, values), and behavioral aspects (usage patterns, pain points).
User Personas
Create detailed user personas to represent different segments of the target audience. Each persona should include a name, background, goals, challenges, and how they interact with the product.

Understand Why They Will Use It
User Needs and Pain Points
Conduct research to understand the specific needs and pain points of your target audience. This can involve surveys, interviews, and observational studies.
Benefits and Solutions
Map out how the product addresses these needs and pain points. Clearly articulate the benefits users will gain from using the product, such as increased efficiency, cost savings, or enhanced experiences.
Align User and Business Needs
Business Objectives
Outline the key business objectives that the product aims to achieve. This could include increasing market share, generating revenue, enhancing customer satisfaction, or entering new markets.
Value Propositions
Develop value propositions that align user benefits with business goals. Each value proposition should clearly state how the product meets user needs while also driving business success.
Create Consensus Among the Team and Stakeholders
Collaborative Workshops
Organize workshops with team members and stakeholders to collaboratively define and refine the value propositions. Use tools like the Value Proposition Canvas to visualize and discuss ideas.
Communication Plan
Develop a communication plan to keep all stakeholders informed about the value propositions and how they guide the product development. Regular updates and feedback loops are crucial for maintaining alignment.
Documentation
Document the value propositions in a clear and accessible format. This can be a value proposition statement or a detailed report shared with the entire team and stakeholders.

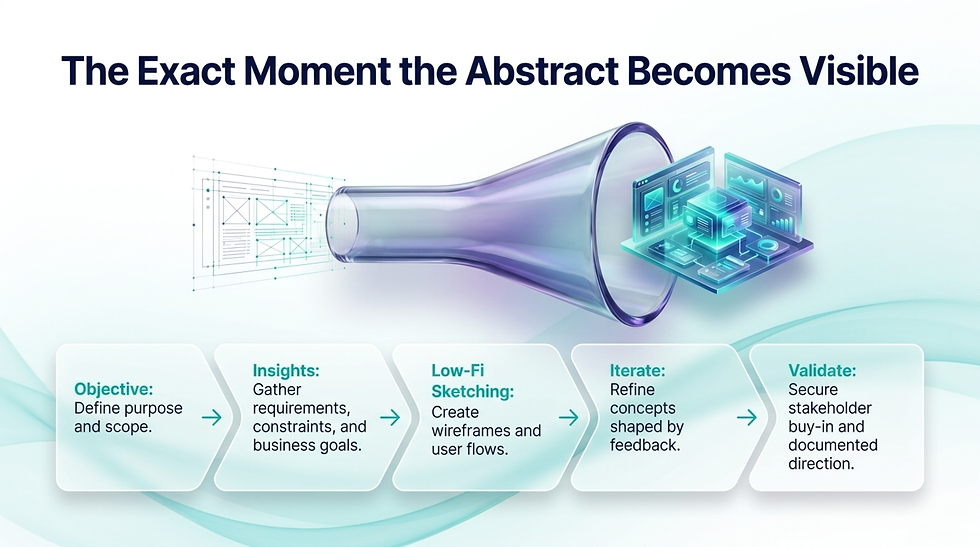
Concept Sketching
Now the fun part. The first time the abstract becomes visible. The first time a stakeholder can look at something instead of imagining it.
This is where ugly drawings beat polished prototypes. Speed beats fidelity. Many bad ideas on paper beat one perfect idea in your head.
Five steps to do this right.
The step | What it produces |
Define the objective of the sketch | A clear purpose and scope for the exercise |
Gather requirements and insights | Alignment between user needs, business goals, and constraints |
Begin sketching (low fidelity) | Wireframes, user flows, and component sketches |
Iterate and refine | Improved concepts shaped by feedback |
Validate and communicate | Stakeholder buy-in and documented direction |
Define the Objective of the Sketch
Purpose
Clearly state what you aim to achieve with the concept sketches. This could be to visualize initial ideas, explore different layouts, or communicate concepts to stakeholders.
Scope
Determine the scope of the sketching exercise, such as specific features, overall user flow, or the entire product architecture.

Gather Requirements and Insights
User Needs
Refer to user research findings, personas, and user journeys to ensure the sketches align with user needs and behaviors.
Business Goals
Incorporate business objectives and requirements into the sketches to ensure they align with strategic goals.
Constraints
Identify any technical, design, or resource constraints that should be considered during the sketching phase.
Begin Sketching
Tools
Use simple tools such as paper and pen, whiteboards, or digital sketching tools like a tablet with a stylus.
Low-Fidelity Approach
Start with low-fidelity sketches to quickly explore different ideas and concepts without focusing on details. This can include wireframes (basic outlines of key screens or pages, showing the layout and structure), user flows (diagrams that map out the user journey and interactions with the product), and component sketches (detailed sketches of specific components or features, such as navigation menus or forms).

Iterate and Refine
Feedback
Share the sketches with team members and stakeholders to gather feedback. Use their input to refine and improve the concepts.
Iteration
Make multiple iterations of the sketches, gradually incorporating more details and improving the overall design based on feedback and further insights.
Prioritization
Focus on the most critical parts of the product first, ensuring that key features and user flows are well-defined before moving to less essential elements.

Validate and Communicate
User Testing
Conduct informal testing with users to validate the concepts and gather early feedback. This can help identify potential usability issues or areas for improvement.
Stakeholder Reviews
Present the refined sketches to stakeholders to ensure alignment and buy-in. Use these sessions to clarify any misunderstandings and agree on the direction.
Documentation
Document the final versions of the concept sketches, including annotations and explanations where necessary. This documentation can be used as a reference throughout the design and development process.

Putting it all Together
Defining a product is the cornerstone of any successful design journey. By thoroughly understanding the project's scope, mapping out a clear value proposition, and bringing your early ideas to life through concept sketches, you create a solid foundation that guides everything that follows.
Get this information from your Product Manager before you move forward. Skipping or glossing over these steps can lead to major issues down the road. Designers often end up reworking the product two or three times when essential details surface later in the process. Taking the time now to align ensures you won't waste valuable time on redesigns and can move ahead with confidence.
That's the foundation. Up next, Part 2: where we move from assumption to evidence. Research time.

Read The Full Series
This is Part 1 of 5.
Part 1 | |
Part 2 | Research |
Part 3 | Analysis |
Part 4 | Low Fidelity Designs |
Part 5 | High Fidelity Designs |


Comments